


.jpg)
* This function is only available with THETA X(firmware version 2.60 or later).
Withthe plug-in “HDR-DNG,” images are recorded in 16-bit depth, which containsgreater information than the JPEG (8-bit depth) format in the existing HDRrendering mode of THETA X. This allows for shooting of 360-degree images with overexposure/underexposuresuppressed and with noise in dark areas reduced.
Moreover,shot images can be saved in DNG file format, making it possible to develop360-degree images with the white balance and exposure adjusted usingdevelopment software such as Adobe Lightroom.
HDR-DNGis pre-installed in THETA X (firmware version 2.61.0 and later), so you can usethis function simply by updating the firmware.
Howto start “HDR-DNG” and how to shoot with “HDR-DNG” are described below. Referto them when using “HDR-DNG.”
Preparations beforeuse
- Switch on the THETA X and furthermore turn on the wireless LAN and set it to AP (Access Point) mode (AP is displayed Settings on the wireless icon).
If the connection is in CL mode, swipe down from the top edge of the THETA X screen to open the Client Mode in the menu that appears, and turn the toggle from ON to OFF to switch to the AP mode connection. - Select [THETAYRxxxxxxxx(8-digit number).OSC] on the wireless LAN access point selection screen of a smartphone.
Generating the icon on the home screen
When using theplug-in for the first time, it is recommended to create the icon for easy startupof the plug-in in the future on the smartphone home screen.
Generating theicon by linking THETA X with a smartphone using the smartphone camera
- Swipe left from the right edge of the LCD panel of THETA X.
The plug-in menu opens. - Tap HDR-DNG in the plug-in menu.
The plug-in starts. - Tap the QR code icon at the top right of the THETA X plug-in screen.
The QR code is displayed. - Start the smartphone camera and read the QR code on the THETA X screen.
- Tap the displayed URL [192.168.1.1:8888].
The web browser starts and the web UI is displayed. - Tap Add to Home screen in the web browser menu.
The icon is generated on the smartphone home screen.
Generating the icon from the RICOH THETAbasic app
- Start the RICOH THETA basic app (download here) on the smartphone.
- Tap the Settings icon in the menu at the bottom of the screen.
- Tap Camera settings.
- Tap Plug-in.
- Tap HDR-DNG.
- Tap Starting plug-in.
The browser starts. - Tap Add to Home screen in the browser menu.
The icon is generated on the smartphone home screen.
Procedure whenusing the plug-in for the second time and onward
When using theplug-in for the second time and onward, follow the procedure below to start theplug-in.
- Swipe left from the right edge of the LCD panel of THETA X.
The plug-in menu opens. - Tap HDR-DNG.
The plug-in starts.
At this time, if THETA X is in the CL mode or if the AP mode connection between the smartphone and THETA X has not been established, the Wi-Fi mark appears at the top right of the screen. Tapping this mark opens the “Communication information” screen. Read the QR code with the smartphone camera to switch to the AP mode connection. - Tap the generated icon on the smartphone home screen.
The web browser starts and the web UI is displayed.
Shooting andperforming other operations
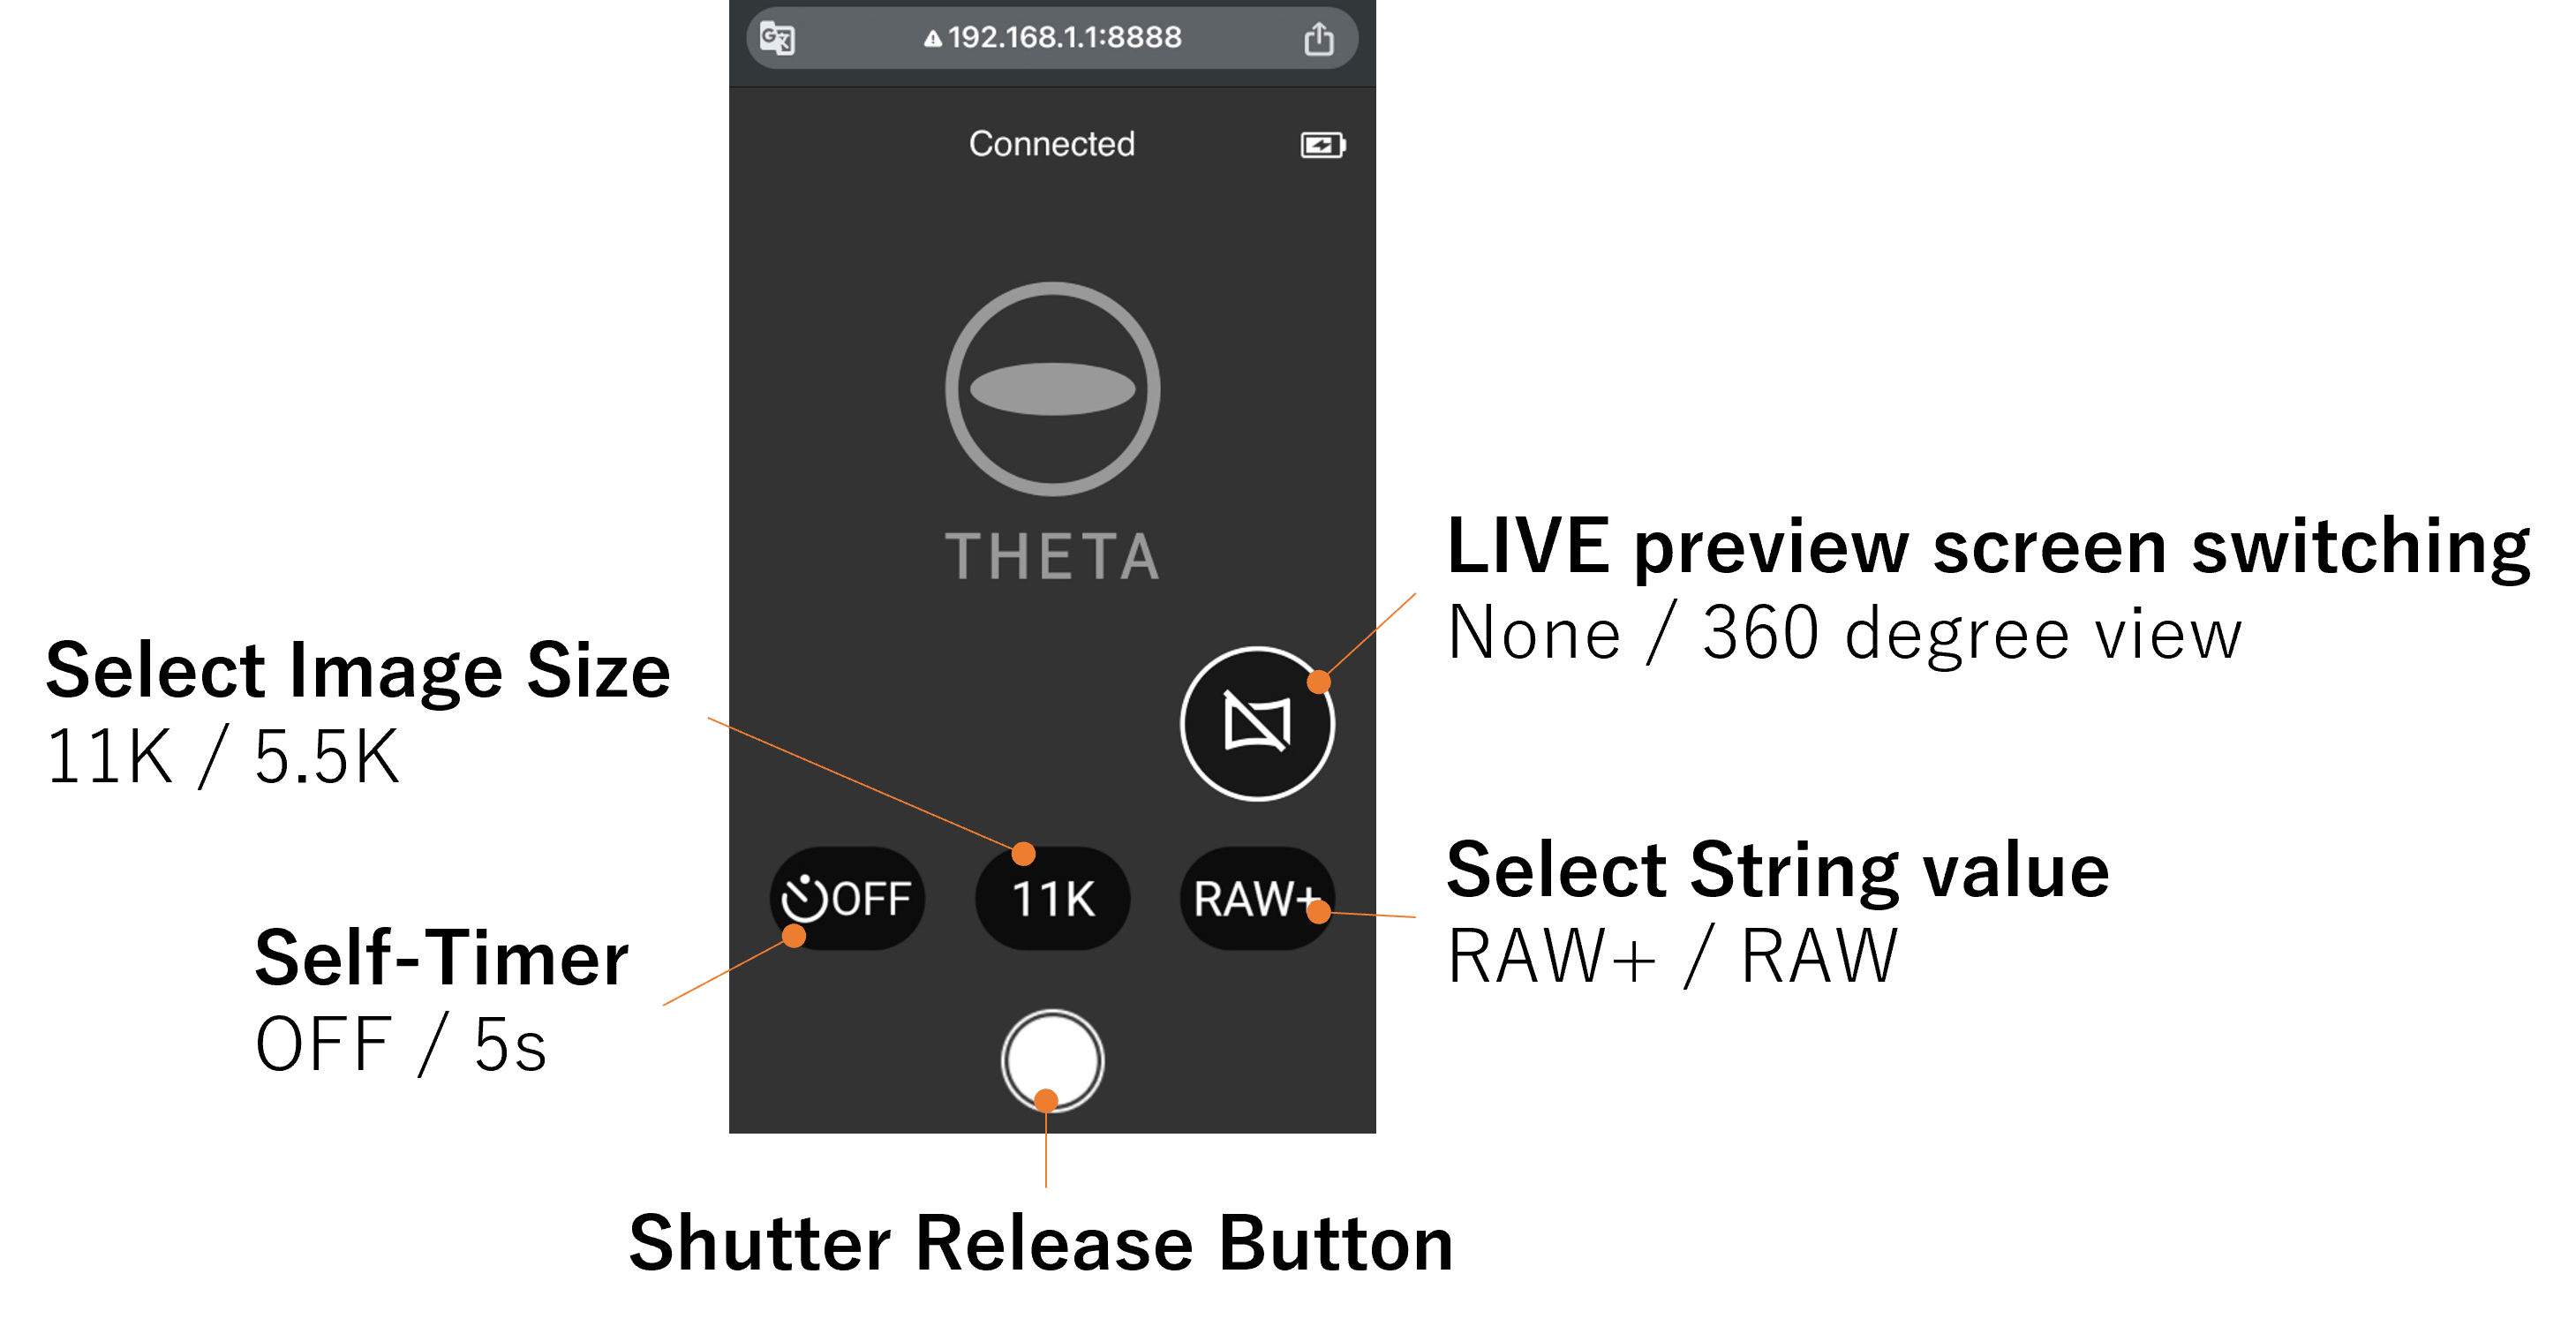
◆Shooting
Shooting is possible using thesmartphone web UI shutter button, Bluetooth remote controller, or shutterbutton on THETA X. Image processing takes up to around 10 seconds after youpress the shutter button. To prevent THETA from moving during this time, secureTHETA to a tripod, etc.
◆Exiting the plug-in mode
Press and hold the mode button on theside of THETA.
* QR Code is a registered trademark of DENSO WAVE INCORPORATED.
DevelopingDNG-format images as 360-degree images
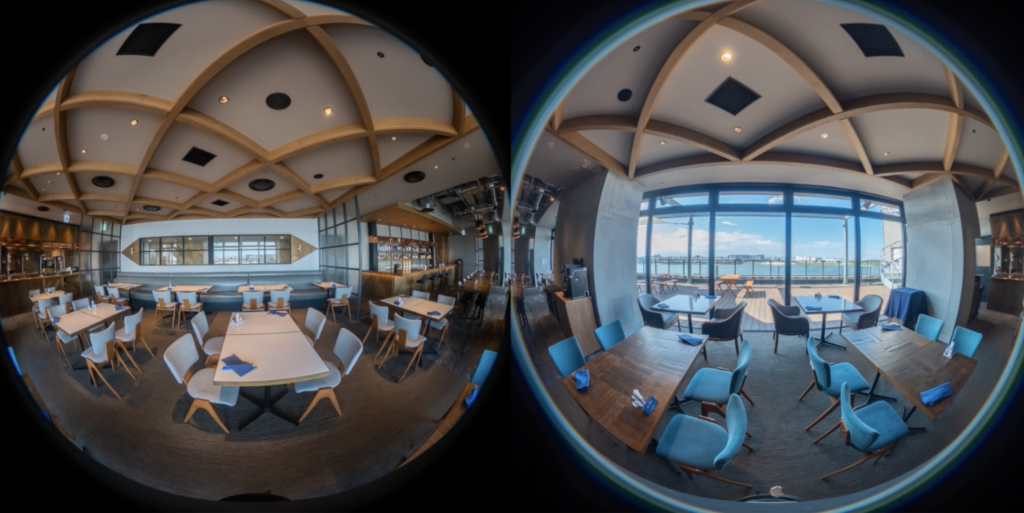
Like RAW images shotwith THETA Z1, DNG-format RAW images shot with the plug-in “HDR-DNG” have to bestitched together using RICOH THETA Stitcher to create a 360-degree image afterdeveloping the images using the RAW image development software such as Adobe Photoshop Lightroom Classic.
1. Using the RAW image development software(*),edit RAW images shot with the plug-in “HDR-DNG” and export them as JPEG/TIFF images.
* The RAW image development software for whichoperation has been confirmed by Ricoh is Adobe Photoshop Lightroom Classic 13.5.
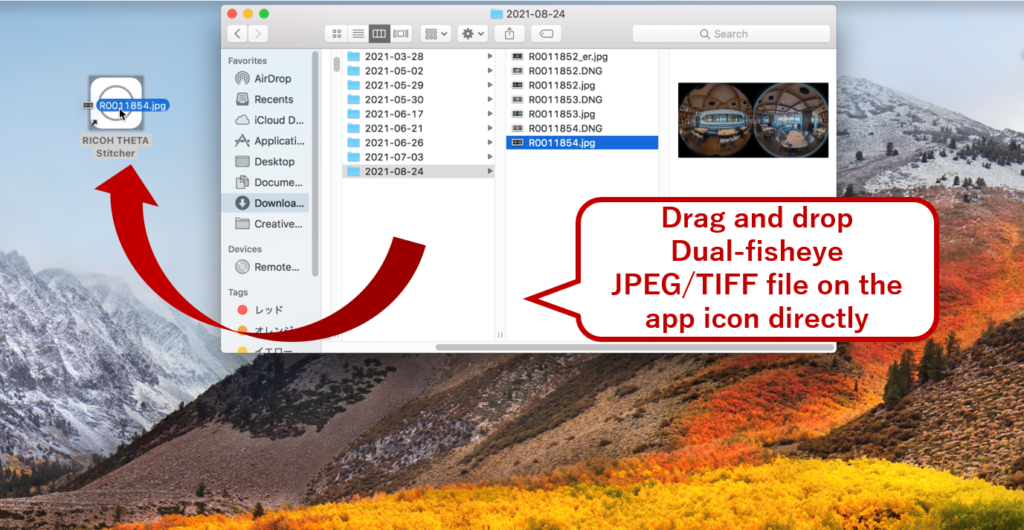
2. Start the latest version of RICOH THETA Stitcher (Download here), and drag and drop the JPEG/TIFF data you want to stitch together into the 360-degree image.
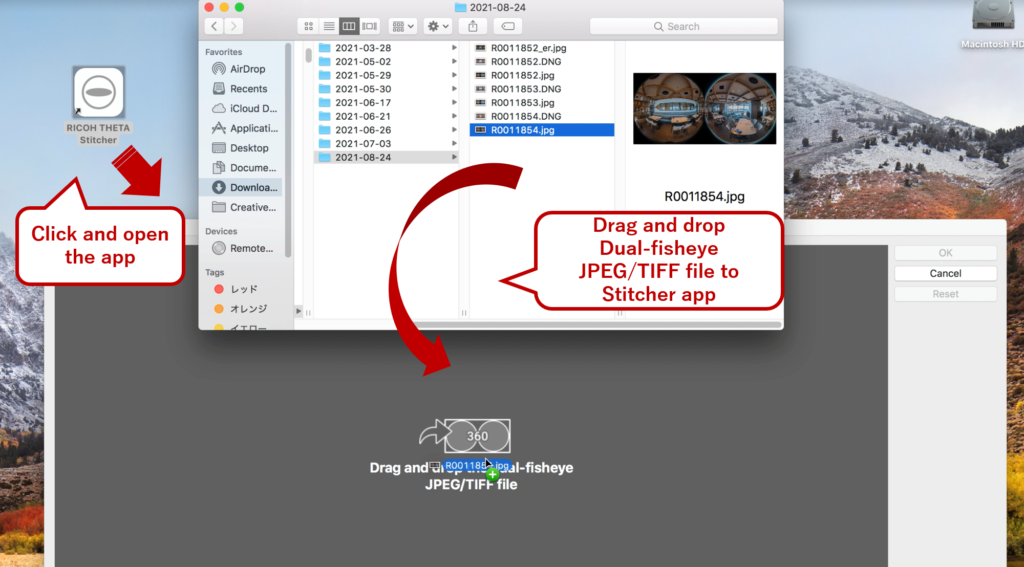
* For Mac, an alias (shortcut) is notautomatically generated on the desktop even after installing RICOH THETAStitcher. Start it from Launchpad or create an alias on the desktop directly ifnecessary.
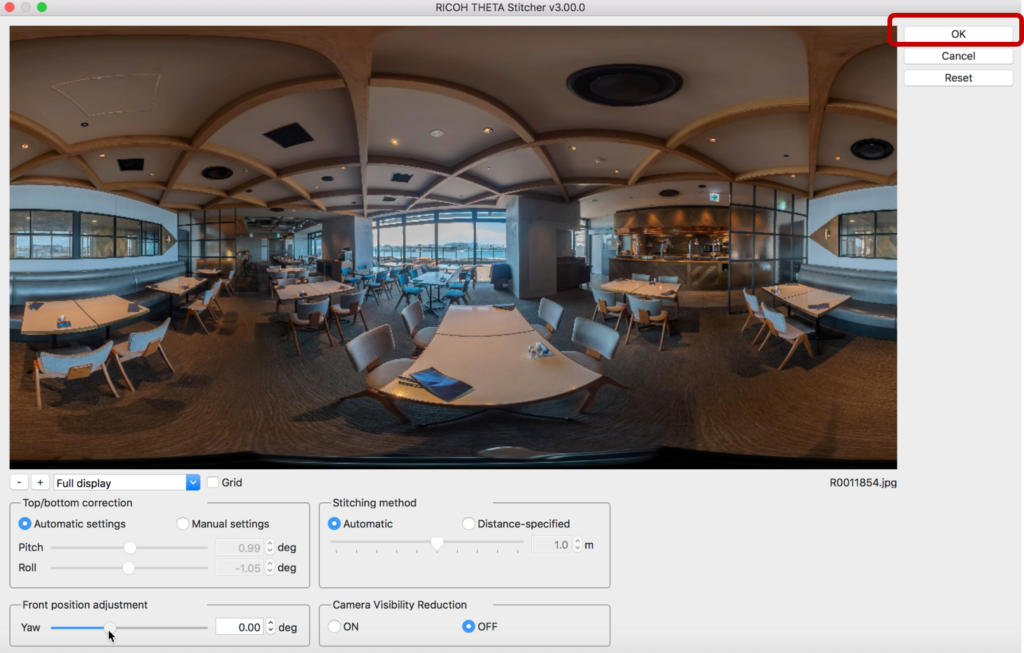
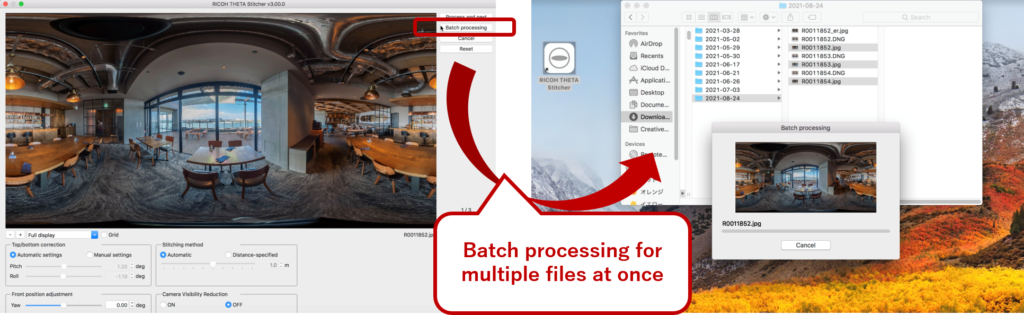
3. Adjust the front position to your liking andclick [OK] to export the image. ↓
* Images can also be dragged directly onto theicon. ↓
* Batch processing of multiple images is alsopossible. ↓

Youcan export images in one batch with [Batch processing]. ↓
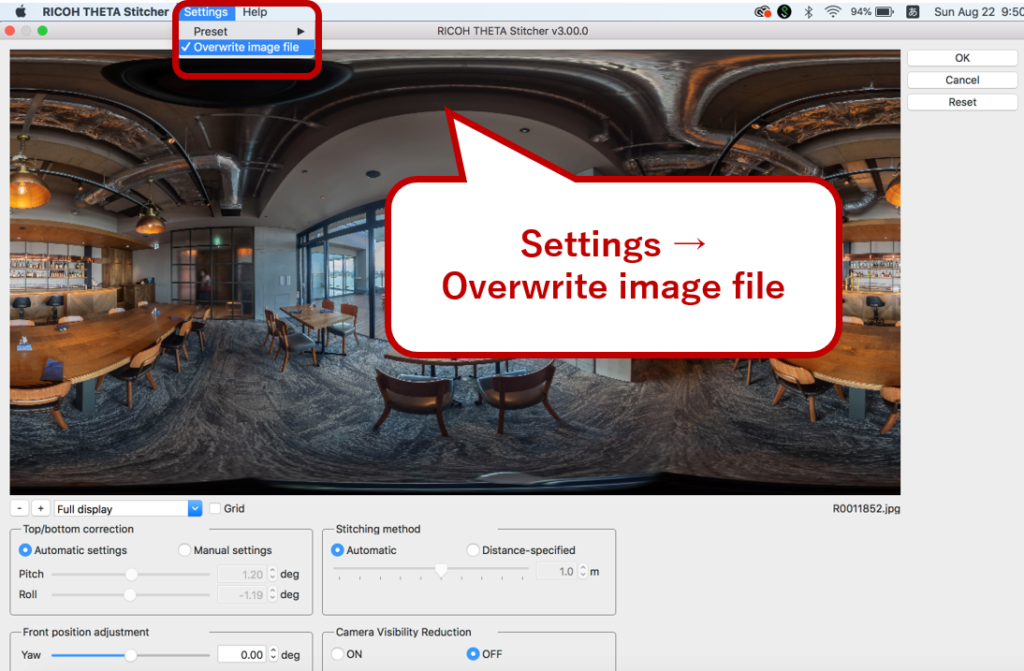
* Images can be overwritten or saved as separatefiles. (Unchecking the checkbox adds “_er” to the end of the file name and theimages are saved as separate files.) ↓
Precautions whenusing RICOH THETA Stitcher
Inorder to perform good stitching on the same level as a JPEG image processed inTHETA, be sure to take note of the following points.
Caution:
- Use images shot with THETA Z1 or THETA X.
- Only dual-fisheye JPEG or TIFF files can be processed. For TIFF files, only 8-bit or 16-bit RGB-format files are compatible.
- Images of sizes 11K (11008 × 5504) and 5.5K (5504 × 2752) shot with THETA X, and images of size 7296 × 3648 shot with THETA Z1 can be processed. When using HDR Merge of Lightroom Classic, uncheck the [Auto Align] checkbox.
- It is recommended to store JPEG/TIFF files in the same folder path as the original DNG file or in the folder path one level below.
Thelatest version of RICOH THETA Stitcher released on September 18, 2024, iscompatible with DNG-format image files shot with the plug-in “HDR-DNG” forTHETA X. Click here for more details.


.svg)


